

Beach Bug - Fly Tying Step By Step
Who doesn't enjoy a good crab or shrimp fly? The real find for me is a pattern like the Beach Bug, designed by Eric Balser out of Mount Vernon, WA. This fly replicates immature crab and shrimp on another level. SImple to tie, catches tons of fish and is easily adaptable to any water situation with color or weight change. That's a winning fly. If you've stayed away from crab or shrimp flies, this is a great pattern to learn for confidence on the vise and on the water. Thanks for tying along and enjoy this amazing pattern.
Materials List:
Hook: Umpqua XS 506 size 6
Bead: Spawn Fly Fish Slotted Tungsten Football Bead 6mm Crayfish Brown
Thread: UniThread Camel 6/0
Weighted Wire: NL .015
Eyes: Hareline Mono Eyes Large
Head/Body: Spawn UV Ghost Shrimp and Spawn Ghost Shrimp Simi Seal
Shell(s): Hen Pheasant Neck Feather
Sealant: Liquid Fusion
Step 1: Slip your Football Bead onto your hook with the point going through the small hole first. Once securely in the vise, add 12 wraps of .015 non lead wire, trim both ends and smooth and then slide into the back of the bead to secure. We want the full bottom of the bead on the underside of the jig hook and the slot on what will be the top of our fly.

Step 2: Begin your thread behind your wire wraps and proceed to cover the wire wraps with some angled thread wraps before some stronger wraps that run parallel with the wire. Take your thread down to the hook bend.

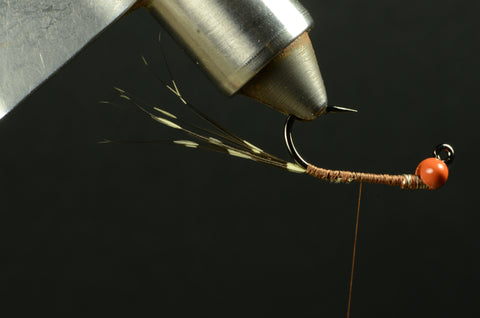
Step 3: Tie in 8-10 Jumbo Guinea Fibers so the natural curve will follow the hook bend. Once we wrap over them with some dubbing the effect will be slightly more noticeable, so no need to wrap down too far.
Step 4: Now we will add a pair of Mono Eyes on the inside of the hook shank. Use figure 8 wraps followed by wraps in front and behind the eyes. Tying them on the inside of the shank allows for some extra abuse before they are removed.

Step 5: Add enough UV Ghost Shrimp Simi Seal to your thread to form a tight, 3 inch dubbing noodle. Use this to wrap around and in front and behind the eyes. Now take your thread to behind the bead.

Step 6: Now we will make another dubbing noodle using the regular Ghost Shrimp Simi. This body will be dubbed to the head and mono eyes and dubbed over itself back to behind the bead.

Step 7: Gently brush out the head and body Simi fibers. No need to trim or get too crazy with the fibers at this point. We'll mash them down when we add the feather shell.

Step 8: Remove 2 matching feathers from the neck, or collar section of a hen pheasant. Once trimmed the feather should reach from the bead to just past the Mono Eyes.

Step 9: Tie in a feather on the top side of the fly. Two gentle wraps for placement followed by a couple stronger thread wraps should keep your feather from turning.

Step 10: Dorsal view after tying in.

Step 11: Now repeat the process on the bottom side of the hook. Once the excess feather has been trimmed, make a neat thread neck and tie off with two whip finishes.

Step 12: To finish this fly you can use resin, cement or even nail hardener. But my favorite way to finish this fly is with a healthy dose of Liquid Fusion coated over the thread wraps, base of each feather and slightly pulled up the quill on each. This provides minimal protection to the feather fibers, but it adheres the quill and Simi Seal together nicely. Let the Liquid Fusion dry for a full 24 hours for the strongest bond before you start feeding these to your favorite crab and shrimp lovers.
