Is there anything better than fishing a dragon or damsel hatch? There is! Now you can toss the fish a nymph with the new Slotted Tungsten Football Bead from Spawn Fly Fish. Bugginess counts in the fish game and this bead not only covers the aesthetics, it also gets down in a hurry. Trout and bass will both love eating this bug. With the Spawn Football Bead and the First Down Dragon you are always moving in the right direction. Thanks for tying along and we look forward to seeing what you design with the new beads!

Materials List:
Hook- Umpqua U555 size 10
Bead- Spawn Fly Fish Football Bead 5.5mm KG Olive
Weighted Wire- Non Lead .015
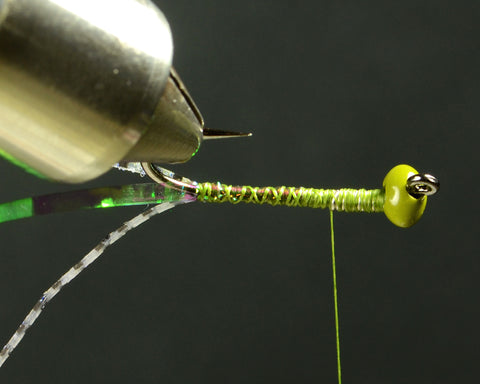
Thread- UNI 6/0 Olive
Tails and Legs- Grizzly Flutter Legs Black Barred Clear UV Pearl
Flash- Saltwater Flashabou Pearl Olive
Rib- Ultra Wire Chartreuse sz Brassie
Abdomen- Simi Seal Golden Olive
Body Skirt- Nature's Spirit Light Olive Mallard Flank
Thorax- Simi Seal Peacock
Loon Hard Head
Resin- Loon UV Clear Fly Finish Thin
Step 1:
Place your bead on the hook with the hook point going through the small hole first. The most effective way to use the Spawn Football Bead is to have the slot facing upward. This will leave more weight under the hook shank for a more effective keel.

Step 2:
Add 15 wraps of .015 non lead wire to the hook shank. Once you've cut and smoothed the wire edges, add a small amount of super glue gel or Zap-a-Gap to the wire and push into the back of the bead to secure in place. Once in position hold for just a few seconds to let the glue adhere. The key is to use a very small amount and not let it touch the hook shank. Makes a bond very quickly.

Step 3:
Now begin your thread on the hook shank behind the wire wraps. Take 2-3 passes over the wire to cover and wrap down to where the hook begins to bend.

Step 4:
Clip one full leg from a set. Tie this in at the middle of the leg and use figure 8 wraps to spread the tails to either side. If you clip the tails to body length the remaining pieces will be just right for our thoracic legs in a few steps.

Step 5:
Tie in a piece of the ribbing wire so the end butts against the rear of the weighted wire wraps. Wrap securely all the way back to where our tails are tied in.

Step 6:
Now tie in a piece of saltwater Flashabou on what will be the top of the fly. Be sure to wrap all the way back to the previous tie-ins.

Step 7:
Add a thin layer of Simi Seal to your thread to form a noodle roughly 4". Beginning behind the weighted wire dub the abdomen back to the hook bend. Once you've reached the previous tie-ins, pull the wire forward and make one pass with your dubbed thread behind the ribbing wire. This will cover any thread from our tie in as well as preventing the wire from dislodging and dubbing when we wrap the rib. After that one pass behind the wire pull the wire back toward the rear of the fly and continue dubbing the abdomen to the front of the hook and you should end the abdomen where it began.

Step 8: Bring the Flashabou over the top of the abdomen. Tie down all the way to behind the bead, but do not cut the flash. We will use it later as a wing case.

Step 9: Now we will wrap the wire rib in 5-6 evenly spaced turns. Tie off and trim the excess wire. Cover the trimmed end with a few thread wraps.

Step 10:
For our body skirt we will use a feather with fibers equal to the full body length of the fly. The purpose of the mallard is to add some mottling to the profile as well as some gentle movement. Trim the top portion of the feather as in the
photo.

Step 11: Tie in the feather where the abdomen ends. The inside, or concave side of the feather should be against the hook shank.

Step 12: Take two wraps of the feather making sure to keep all the fibers facing the rear of the fly with your off tying hand. Tie off the feather with 4-5 strong thread wraps before you trim the excess feather. Now you can see how that flash will blink at the fish in the water through the mottled fibers.

Step 13: In the space we've left for the abdomen we will now tie in our legs. Using the trimmed ends of our tails tie in one leg on each side of the hook shank. Keep these in the center of the thoracic space.

Step 14: Add enough Peacock Simi Seal to your thread to form a tight 3" dubbing noodle. Dub toward the back of the thorax, going between the legs, and then dub to the front in the same fashion. You should now be directly behind the bead.

Step 15: Pull the Flashabou over the thorax and tie down with 3-4 solid wraps of thread. Pulling the flash back over itself and taking two more thread wraps over before you cut will prevent the flash from slipping out after a fish hits it. Tie a neat thread collar and add two whip finishes. Add some Hard Head to the thread wraps. On top of the wing case add two layers of Loon Thin UV resin, curing after each layer. Thanks for tying the First Down Dragon and have a blast catching a bunch of fish!

Once you've tied down the cut end of the feather, pull back and tie down the Flashabou so it rests over the feather. This will now be our wing case.

Leave a comment