

Vinyl Rib Caddis Larva
Although we primarily tie streamers and shrimp using Spawn products we still have love for the little things. On the Spawn Blog we will not only highlight flies tied on Spawn Products but also begin to feature must have patterns for every occasion. This Caddis Larva from our very own Pete Rosanue is a fantastic pattern for your nymph box. Below is and easy to follow step by step blog on how to bring this pattern to life!
Materials list with direct links to buy:
Hook: Daiichi 1870 sz 14
Thread: Dark Brown 6/0 Uni
Weight: .015 LF or Lead Wire
Body: Amber Vinyl Rib and Pearl Lateral Scale
Thorax: Nature’s Spirit Caddis Green Peacock Eye
Wing Case: Olive Dura Skin
Hook: Daiichi 1870 sz 14
Thread: Dark Brown 6/0 Uni
Weight: .015 LF or Lead Wire
Body: Amber Vinyl Rib and Pearl Lateral Scale
Thorax: Nature’s Spirit Caddis Green Peacock Eye
Wing Case: Olive Dura Skin
Step #1. Place a Daiichi 1870 sz14 hook in your vise.

Step 2. Place 7-8 wraps of .015 Lead Free Wire on the hook shank leaving just over one hook eye length behind the hook eye bare.

Step 3. Begin your thread on the hook and cover your wire wraps taking care to not let them shift. Cut a 3-4 inch piece of amber Vinyl Rib. The rounded side should be facing the shank as you tie it in. Begin tying in your Vinyl Rib so that the end matches up with the rear wraps of .015 wire.

Step 4. Tie down your Vinyl Rib to roughly above the hook barb. Make sure your Vinyl Rib stays on top of the hook shank while also watching that it doesn’t twist.

Step 5. Tie in a piece of pearl Lateral Scale. Make sure your thread wraps go all the way to the wraps used for your Vinyl Rib. Advance your thread to near the hook eye.

Step 6. Using overlapping wraps advance the Lateral Scale up the entire body to roughly halfway on the wire wraps. Tie off with 3-4 strong wraps and then fold the Lateral Scale back over itself toward the rear of the hook while maintaining thread tension. Wrap 2-3 times and neatly trim off the remaining Lateral Scale.

Step 7. Now wrap the Vinyl Rib to just past the beginning wraps of wire. Tie off with 4-5 firm wraps of thread and neatly trim away the excess Vinyl Rib for your next fly.

Step 8. Cut a strip of D’s Flyes olive Dura Skin that is just slightly wider than the Vinyl Rib abdomen. Trimming to a V shape makes for an easier and cleaner tie in.

Step 9. Securely tie in your piece of Dura Skin. The proportion we’re looking for is roughly 2/3 abdomen or body to 1/3 thorax. Tie back the Dura Skin until you feel you are right around 1/3 back on the entire body of what will be your finished fly.

Step 10. Cut off 2-3 herls from a caddis green Peacock Eye. Tie in all 3 back to the same tie in for the Dura Skin. Trim off the excess peacock and advance your thread to behind the hook eye. At this point gently twist the peacock herls together always twisting the same direction. Don’t put on too much pressure or you’ll need to tie in new peacock.

Step 11. Wrap the peacock herls forward to just behind the hook eye. As you wrap the peacock forward you may need to add a twist or two between wraps to maintain the grouping. Tie off and trim the excess peacock being as clean with your cuts and thread wraps as possible.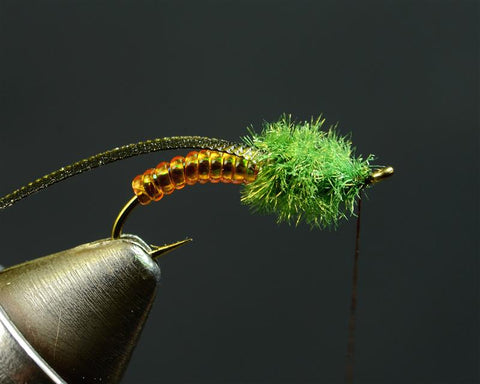

Step 12. Pull the strip of Dura Skin over the peacock thorax. Securely tie down the Dura Skin making sure it is centered on top of the shank. Trim the excess Dura Skin and wrap a neat thread head. After 2 whip finishes cut your thread and cover the head with a thin layer of Loon Hard Head.

Step 13. Add a small amount of Loon Thin UV Clear Fly Finish on top of the Dura Skin. Cure with your UV torch and this caddis is ready for action.
