
Bucktail Brown Trout- Using Bucktail with Micro Jig Shanks
Spring is going to be here soon and that means hungry fish. A slowly stripped minnow pattern is the perfect meal for those waking giants. For this example we’ll be emulating a brown trout minnow, but with the simple swapping of bucktail colors you can cover any baitfish your heart and home waters desire. As with most bucktail flies, less is more! Happy tying.
-Pete
Materials List:
Hook: Ahrex SA274 sz 12
Shank: Spawn Fly Fish Micro Shank 60*
Thread: UniThread 6/0 Camel
Underbody: Pearl Tinsel Chenille
Bucktail: Nature’s Spirit Yellow, White and Brown
Bead: Hareline Slotted Tungsten 5.5mm 7/32”
Head Cement: Loon Hard Head clear
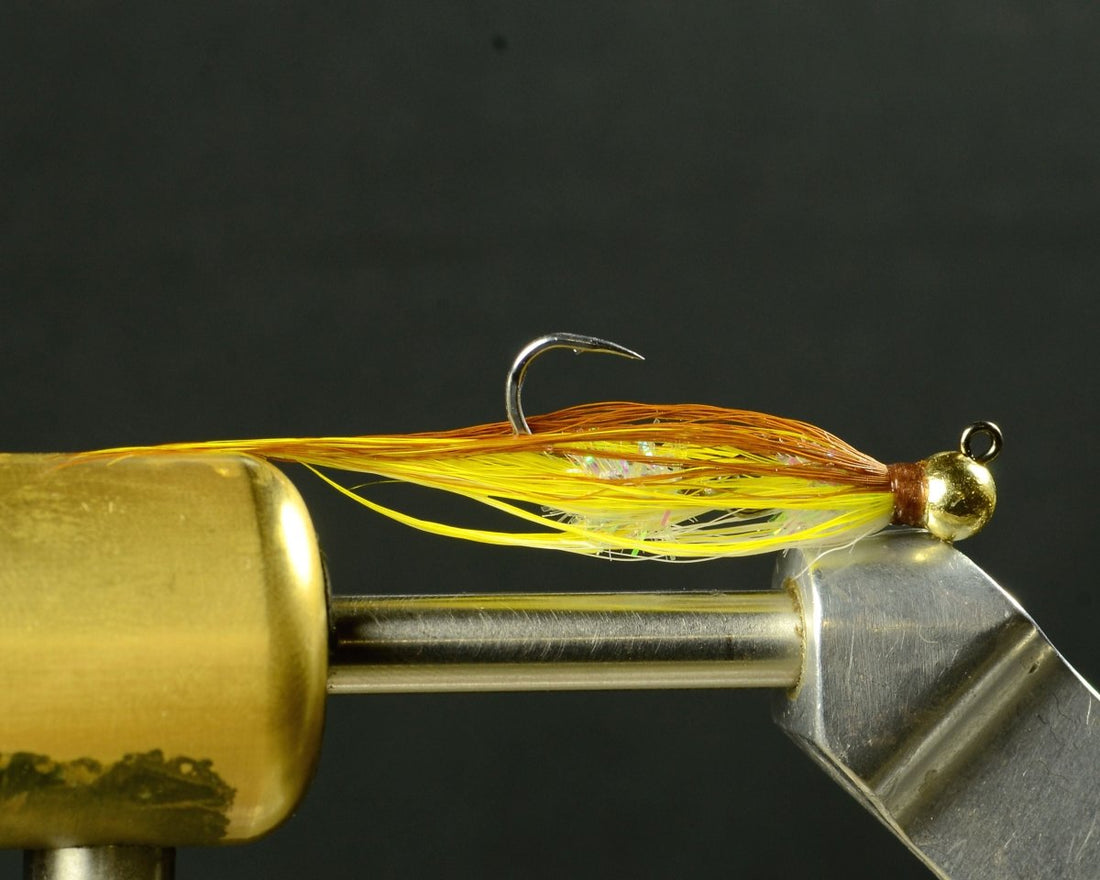
Step 1: Affix your hook in the vise and begin your thread. We want to keep the thread and materials on the flat portion of the shank before it begins to bend.

Step 2: Since this trailing hook will ride hook point up, we will put the white, or underbelly, color on top of the hook. Tie in a sparse amount that is roughly equal to the length of the hook and shank combined. For this pattern I do not stack the bucktail. To my eye it has a more natural taper if there are some longer fibers.

Step 3: On the underside of the hook shank, which will be the top of the finished tai, tie in a small bunch of yellow bucktail that slightly extends past the white bucktail. Just a matter of a millimeter or two.

Step 4: Tie in a 3-4 inch section of pearl tinsel chenille. This will be enough to do both the hook and shank on a couple flies. Pearl is a general color that works for any baitfish, but you can easily alter the finished look of your fly by changing just the chenille.

Step 5: Wrap the chenille up the hook shank, tie off and trim the excess. Add two whip finishes and cover the thread head with head cement.

Step 6: Slip a bead onto your Spawn micro shank and then add the hook making sure to keep the hook point facing upward. Before securing down the shank arm I like to add enough wraps of .020 non lead wire to position the bead and also match up with where the shank are is tied down. This helps maintain a consistent underbody thickness.

Step 7: After securing down the shank arm and weighted wraps we will add a small batch of white bucktail to the underside of the shank. This will be a bit tricky because of the vise jaws, but with some patience it’s not that bad. The length of the bucktail should reach halfway back on the tail fibers. This small amount of bucktail will not only help camouflage the shank connection, but it will also help support the trailing hook from dropping too much and thus helping to control some of the bucktail fouling.

Step 8: Add a small amount of yellow bucktail to the top side that matches the length of the white underneath.

Step 9: Tie in and wrap forward the chenille the same way we did for the tail section. We do want to leave a small amount of space behind the bead to allow for the bucktail, so wrap just shy of completely filling the shank. Tie off the chenille and trim the excess.

Step 10: One more time we will add a small amount of white bucktail to the underside of the shank. This will look sparse because of the chenille forcing it outward, but once all three colors have been tied in and the fly is wet it will provide plenty of cover. Don’t add too much bucktail!

Step 11: Add a small amount of yellow bucktail to both sides of the fly. These fibers are going to reach 2/3 of the way back on our previous bucktail.

Step 12: For the final batch of brown bucktail we will use a length that reaches just shy of the end of our tail fibers. After you have trimmed the butt ends of the bucktail make a neat thread neck and add two whip finishes. Apply a coat of head cement to the thread wraps.

Step 13: After your head cement has fully dried, dunk your fly in some water so the bucktail fibers can all be washed into the profile the fish will see. Thanks for tying along.
