Hotwire Steelhead Copper John!

Hotwire Steelhead Copper John!

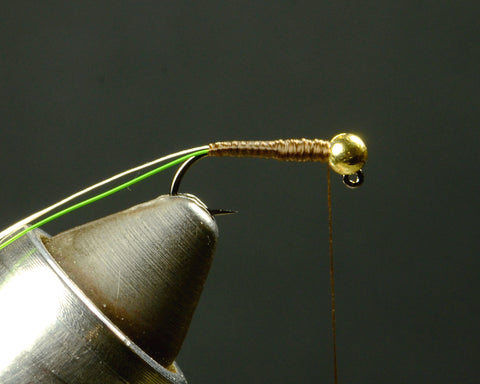
I've always been a fan of the Hotwire style designed by Ken Morrish as well as the iconic Copper John by John Barr. This fly is a combination of the Hotwire Caddis and Copper John with some variations. This pattern is very successful in smaller sizes for trout and other species. Thanks for tying along! 

-Pete 

Materials List:
Hook- Ahrex XO774 sz4
Thread- Ultra Thread Wood Duck 70 
Bead- Hareline Gritty Tungsten Gold 5/32"
Weighted Wire- NL .015
Tails- Hareline Stripped Goose Biots  Gold
Flash- Olive Lateral Scale
Body Wire- Ultra Wire Medium Olive and Gold
Thorax- Spawn Simi Seal Sand Dab
Wing Case- Olive Lateral Scale with Olive Thin Skin
Wing/Legs- Nature's Spirit Mallard Flank Blue Winged Olive
Collar- Nature's Spirit Duck Cul De Canard  Wood Duck
*Loon Hard Head
*Loon UV Clear Fly Finish Thin
Step 1:      Before putting the hook in the vise, you will probably need to crimp the barb on the hook with a smooth pair of pliers. Once you've slipped the bead onto the hook, place it into your vise.
Step 2: Add 15 wraps of the .015 non lead wire to the hook shank. After clipping and smoothing both ends of the wire wraps, push the wire into the back of the bead. 
Step 3:  Begin your thread on the hook and cover the wire wraps with a few passes of thread. Tilt the hook in the vise and take your thread down to where you'd like the tails to split. Take a few extra wraps of thread at this spot to create a thread bump. This will help to keep the tails separated.  
Step 4:  Tie in two goose biots on top of the hook, but making sure they point outward. As you tie down to the thread bump and snug against it with thread wraps you can feel the biots seating securely. Take your time before this point to make sure you have the tails exactly where you want them.
Step 5: Tie in a piece of olive Lateral Scale all the way back to the last thread wraps of the tails. It is important to keep the flash directly on top of the hook shank in the tie in as well as while we wrap the body.
Step 6: Tie in both wires, butting them up against the end of our weighted wire wraps. Be sure to wrap the wires all the way to your previous thread wraps. Propping the wires to a 90* bend before you begin wrapping the body will make the first wrap much simpler and cleaner. After securing the wires with a couple passes of thread bring the thread to the back of the bead. 
Step 7: Make two wraps with the wires held together as though they are one. Bring the flash over those first two wraps and trap the flash as you make the third wrap, which is happening in the photo. Make sure the flash is not being crinkled by the wires and that it stays directly on top of the hook.
Step 8:  Bring the flash back over the rear of the hook as you make the 4th wrap with the wires. 
Step 9: Bring the flash back over the 4th set of wire wraps and trap it with the 5th wire wraps. This will continue up the hook shank. The flash will be trapped on any odd number of wire wraps.
Step 10: After you've made a wrap of wire onto the weighted wire, tie down the wires and bend them back toward the hook point before cutting. This will ensure extra strength in your wire bodies. Do not cut the flash.
Step 11: Bring the flash back over the top of the wire wraps and tie back for a small thorax. With a traditional wire body I'd use a longer thorax, but for the Hotwire style I prefer to show off the body a touch more.
Step 12: Tie in a strip of olive Thin Skin that is just smaller than the width of the bead, but is still wider than the Later Scale.
Step 13: Prepare a CDC feather by trimming the fibers at the tip of the feather. This is tied in with the convex, or top side, facing forward and by the tip. It is important to keep this on the side of the hook shank, or even underneath in order to allow for the mallard wing on top of our thorax in the next steps.
Step 14: Add some Simi to your thread to form a thin noodle of dubbing. Dub back once and then forward to behind the bead. There is already a good deal of underbody built up, so you don't need a lot of dubbing.
Step 15:  This is what your mallard feather should look like before tying it in. The fibers should reach comfortably past the body without being excessive. 
Step 16: Tie in the mallard feather with 3 gentle thread wraps. At this point make sure it is positioned properly and gently adjust the length if needed using the butt end of the quill. Once it is to your liking add a couple more securing thread wraps.
Step 17: Take one wrap of your thread in front of the CDC. Then make two wraps of the CDC feather, keeping all the fibers going rearward by stroking them back with your off hand as your tying hand wraps the feather. Tie off and trim the excess. If there are any fibers on top of the hook shank, you can either trim them with your scissors or slide them to either side of the thorax with your finger tips.
Step 18:  Bring the Thin Skin over the dubbed thorax and tied down behind the bead with three strong thread wraps. 
Step 19: Now bring the flash over the Thin Skin and tie down with 2 thread wraps. At this point maintain tension on your thread as you bring the flash back over itself toward the hook point. Take 2-3 thread wraps to catch the flash. Securing it this way will prevent it from slipping out after a toothy encounter. After trimming the flash, make a neat thread collar and add two whip finishes. Trim the thread and add a coat of Loon Hard Head of cement of your choice to the thread wraps.
Step 20: Add a layer of Loon UV Clear Fly Finish Thin to the Thin Skin thorax and cure with your UV torch. Now run another small line of Thin resin over the thorax and down the back of the wired body where the flash is. Quickly cure with your torch. You are now ready to chase some steel with a classy nymph that is sure to be noticed. 

Read more

Spawn Micro Jig Shank Baby Cray SBS- Articulated Crayfish

Spawn Micro Jig Shank Baby Cray SBS- Articulated Crayfish

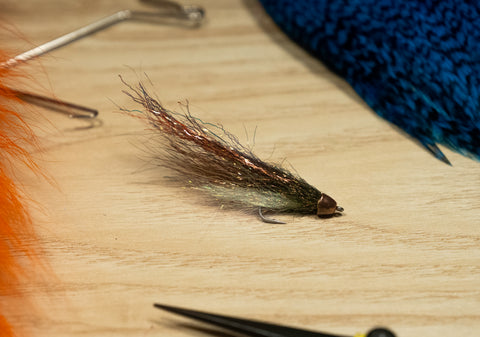
     Spring time means hungry fish and the first sightings of early, tiny crawdads. A small crayfish pattern with articulation and a heavy bottom should be plenty tempting for some waking giants. The Spawn Micro Jig Shank puts this fly in the perfect position to mimic natural crayfish movements. Very little line manipulations equal big movement for this tiny morsel.  

-Pete

Materials List:
Hook: Ahrex SA274 sz 10
Thread: UniThread Camel 6/0
Shank: Spawn Micro Jig Shank 60*
Weighted Wire: NL .020
Bead: Nature's Spirit 5.5mm Tungsten Slotted Metallic Brown
Flash: Krystal Flash Copper Brown
Antennae: Nature's Spirit Select Bucktail Burnt Orange
Hot Spot: Spawn Coastal UV Simi Seal Pesca Hot Pink
Claws: Nature's Spirit Pine Squirrel Zonker Strips Crawdad Orange
Body: Simi Seal blend of 2 parts Crawdad to one part Reddish Brown
Shell: Thin Skin Mottled Bustard Natural
Legs: Whiting Farms Rooster Saddle Feather Brown
Rib Wire: Ultra Wire Brassie Copper Brown
Loon Hard Head
Loon Clear UV Fly FInish Resin Thin and Thick
ALL available at Spawn!
Step 1: Place the hook in the vise. Keep in mind while we tie that this hook will ride point up.
Step 2:  Begin your thread on the hook shank. Where the hook begins to bend we are going to make a small ball of Spawn Pesca Hot Pink Simi Seal to act as a way of keeping the claws separate while also offering a hot spot. The ball is made by dubbing a noodle roughly 3 inches long. Wrap your dubbing noodle back and forth in the width of 3-4 thread wraps. 
Step 3: Add a thin layer of Loon Clear Fly Finish Thin to the dubbing ball. Cure the resin with your UV torch. Now we have a solid hot spot that keeps the claws from collapsing on themselves.
Step 4: We will now tie in our claws. The length of each claw is just shy of an inch, measured on the leather, not the fur. At the base of each claw, remove about a quarter inch worth of fur. This will give us a clean tie in. Tie in one strip on either side the hook. Once they are snugged up against the hot spot they will never foul on the hook point or each other.
Step 5:  Making sure your hook is point up, veil a few strands of Krystal Flashon what will be the top of the head. We will trim these to length after the fly is fully tied. 
Step 7: Now we will add some bucktail fibers. These do not need to be stacked. They should extend just past the claws. Less is more.
Step 8: Load your thread with the Simi Seal blend and form a dubbing noodle. We will be making two full passes back and forth, so make sure your dubbing noodle stays tight and your thread wraps maintain as constant a pressure as possible. Once you've finished the second pass, add two whip finishes and cement your thread wraps.
Step 9: Before connecting the hook to the shank, slip on the bead. Once you've added the hook and placed the shank in the vise, add enough wraps of .020 wire to secure the position of the bead and to also meet where the shank arm is tied down. This will make for a smoother underbody for any shanked flies.
 
Step 10:   Fully wrap down the shank arm and wire wraps with a touch of cement and thread wraps. 
Step 11:  At the rear of the shank we are going to make another dubbing ball, but this one we will not be covering with resin. 
 
Step 12:  After brushing out the dubbing ball and coaxing the fibers rearward, you can see that not only does this help disguise the shank connection, but it will also help to keep the hook in the proper alignment.
Step 13: On the far side of the fly we will tie in our hackle feather. Tie it in so the darker side, or convex, is facing the hook shank. This will allow the better side to face the front of the fly as we wrap. The fish will appreciate the attention paid.
Step 14: Now tie in a 5-6" piece of the copper brown wire. This should be tied in right next to the feather, and both should be tied firmly up to the dubbing we tied in previously.
Step 15: This is roughly what your piece of Thin Skin should look like before we peel off the backing and tie in. This is just shy of one inch in length and just shy of 1/4" in width. The taper will help preventing the Think Skin from folding when tied in. You can always trim the Thin Skin after the fly is finished, but you can not add material back, so a little extra length is ok.
Step 16: Tie in the Thin Skin on the tapered end so the strip goes over the shank eye and bead. Be careful not to add too much tension or stretching so as to not weaken the Thin Skin.
Step 17: In the same way we dubbed the back of the head, we are going to make two full passes back and forth with a dubbing noodle. This does not have to be overly thick, but it does need to be wrapped firmly enough to hold the body profile we want. 
Step 18: Now wrap the feather back in 3-4 evenly spaced wraps. Wiggling the feather ever so slightly as you palmer it will seat it into the dubbing and prevent the quill from slipping somewhat. Tie off the feather with 3 firm thread wraps.
Step 19: Trim all the hackle fibers from the top of the fly body. 
Step 20: As you pull the Thin Skin over the body of the fly, take one wrap of thread so the thread will now be in front of the Thin Skin. Holding the Thin Skin in place with your off hand, take 3-4 wraps of the ribbing wire. Do your best to not crimp the Thin Skin on the sides as you wrap the wire. After trimming the excess wire and tying a neat thread collar, add two whip finishes and cement the thread wraps. Now is the time to pick out some of the Simi fibers and to also add a layer of Loon Thick Fly Finish to the top of the shell. Cure with your UV torch and trim the flash fibers to your desired length. You are now ready to torment some fish!

Read more

Caddis Pupa using a touch of Spawn Simi Seal!

Caddis Pupa using a touch of Spawn Simi Seal!

Spawn's very own Pete Rosenau is at it again! 

This version of a caddis pupa is a great example of using triggers in a simplistic manner that can still produce a semi realistic fly. There is the added bonus of being able to stop halfway through tying the pupa to have an extremely productive cased caddis larva. Why not tie them both and have a caddis selection to cover both needs? Thanks for tying along!


Materials List:

Hook: Daiichi 4647 sz 16

Bead: Hareline Slotted Tungsten 7/64”  2.8mm  Gold

Thread: Ultra Thread 70 Brown

Weighted Wire: LF .015

Body/Abdomen: Peccary Hair- Split

Rib: Ultra Wire Fluorescent Chartreuse Small

Thorax/Hot Spot: Spawn Coastal UV Simi Seal Chartreuse Yellow

Collar: Nature’s Spirit Duck Cul de Cenard  Brown Olive

Body Cover: Loon UV Clear Fly Finish Thin

Loon Hard Head or head cement of your choice


Step 1: Once you’ve picked out your peccary hair, notice the tassle, or split ends at the tip of the hair. Gently peel the hair using these split ends so you end up having two pieces of hair. This will allow for a much smoother body without unnecessary bulk.

Step 2: Once you’ve split the hair you can decided which side to use. If both pieces look ok you can simply tie two flies! 

Step 3: Slip on your slotted bead and then put your hook into the vise. Add 8-9 wraps of .015 non lead wire. These won’t push into the back of the bead, but instead will be held against the back of the bead by the thread wraps.

Step 4: Begin your thread behind the wire wraps. Securely wrap over all the wire wraps and add a layer of thread back to where the hook begins to bend. This will act as your end point for tying in the next materials.

Step 5: Tie in a 4-5” piece of the ribbing wire. This should snug up to the wire wraps. Wrap down to our previous thread wraps and back to the weighted wire wraps.

Step 6: We will now tie in the half piece of peccary hair. The hair should be tied in with the good side of the hair against the hook shank. That way the good side will be exposed as we begin to wrap. The other key is that the peccary be on the away side of the ribbing wire according to where you are seated. As you can see from the photo, we will wrap the peccary hair first which will leave a natural path for the wire to follow in the gaps. If we wrapped the peccary to go over the wire on its first wrap we’d then have to cross the wire over the hair just to start. This would lead to a less than clean look to our finished fly, not to mention adding undue stress to the peccary.

Step 7: Before wrapping the peccary and wire, spin your thread bobbing counterclockwise to flatten the thread. At this point make a few passes up and down the hook shank to create a smooth thread underbody. This makes a big difference when tying quill bodies or flash bodies.

Step 8: Carefully wrap the peccary hair forward up the hook shank in touching wraps. Use a constant, gentle pressure while wrapping. Tie off the hair behind the bead with 5-6 strong thread wraps.

Step 9: Now wrap the ribbing wire in the gaps between the wraps of peccary. Take your time and watch each wrap to ensure proper placement. The same gentle, consistent pressure will ensure the wire is well seated without damaging the peccary.

Step 10: Once you’ve tied off and trimmed the wire and peccary, now is the time to add a thin layer of UV resin. This will add to the visual appeal of the fly as well as strengthen the peccary against toothy critters. At this point you could tie off with two whip finishes and have a very productive cased caddis larva. 

Step 11: Trim the fibers from the tip of a CDC feather. This feather is tied in with the top, or convex side of the feather facing downward, as well as being tied in over the hook eye. This will allow us to make a clean wrap that is held more securely by the wraps we’ll use for the thorax material.

Step 12: Add a small amount of Spawn Simi Seal to your thread. Wrap a compact thorax that will not only act as a hot spot, but will push out the CDC fibers to produce that pupa shape we all recognize.

Step 13: As you bring your feather up to start wrapping the collar, take one wrap of your thread so the thread is now in front of the feather. Make sure all the fibers of CDC are stroked toward the rear of the hook as you begin to wrap the collar. You only need one and a half to two turs of the feather. Once you’ve tied off the feather and wrapped a neat thread collar, add two whip finishes and cover the thread wraps with Loon Hard Head or the cement of your choice. Be careful to avoid getting any cement on the CDC.

Step 14: Once your head cement has dried, dip your fly in some water to see your caddis pupa come to life. Head to your nearest trout water and commence catching.


Read more

Bucktail Brown Trout- Using Bucktail with Micro Jig Shanks

Bucktail Brown Trout- Using Bucktail with Micro Jig Shanks

    Spring is going to be here soon and that means hungry fish. A slowly stripped minnow pattern is the perfect meal for those waking giants. For this example we’ll be emulating a brown trout minnow, but with the simple swapping of bucktail colors you can cover any baitfish your heart and home waters desire. As with most bucktail flies, less is more! Happy tying.

-Pete

Materials List:

Hook:  Ahrex SA274  sz 12

Shank:  Spawn Fly Fish Micro Shank 60*

Thread:  UniThread 6/0 Camel

Underbody:  Pearl Tinsel Chenille

Bucktail: Nature’s Spirit Yellow, White and Brown

Bead: Hareline Slotted Tungsten  5.5mm  7/32”

Head Cement: Loon Hard Head clear


Step 1: Affix your hook in the vise and begin your thread. We want to keep the thread and materials on the flat portion of the shank before it begins to bend.

Step 2: Since this trailing hook will ride hook point up, we will put the white, or underbelly, color on top of the hook. Tie in a sparse amount that is roughly equal to the length of the hook and shank combined. For this pattern I do not stack the bucktail. To my eye it has a more natural taper if there are some longer fibers.

Step 3: On the underside of the hook shank, which will be the top of the finished tai, tie in a small bunch of yellow bucktail that slightly extends past the white bucktail. Just a matter of a millimeter or two.

Step 4: Tie in a 3-4 inch section of pearl tinsel chenille. This will be enough to do both the hook and shank on a couple flies. Pearl is a general color that works for any baitfish, but you can easily alter the finished look of your fly by changing just the chenille.

Step 5: Wrap the chenille up the hook shank, tie off and trim the excess. Add two whip finishes and cover the thread head with head cement.

Step 6: Slip a bead onto your Spawn micro shank and then add the hook making sure to keep the hook point facing upward. Before securing down the shank arm I like to add enough wraps of .020 non lead wire to position the bead and also match up with where the shank are is tied down. This helps maintain a consistent underbody thickness.

Step 7: After securing down the shank arm and weighted wraps we will add a small batch of white bucktail to the underside of the shank. This will be a bit tricky because of the vise jaws, but with some patience it’s not that bad. The length of the bucktail should reach halfway back on the tail fibers. This small amount of bucktail will not only help camouflage the shank connection, but it will also help support the trailing hook from dropping too much and thus helping to control some of the bucktail fouling. 

Step 8: Add a small amount of yellow bucktail to the top side that matches the length of the white underneath.

Step 9: Tie in and wrap forward the chenille the same way we did for the tail section. We do want to leave a small amount of space behind the bead to allow for the bucktail, so wrap just shy of completely filling the shank. Tie off the chenille and trim the excess.

Step 10: One more time we will add a small amount of white bucktail to the underside of the shank. This will look sparse because of the chenille forcing it outward, but once all three colors have been tied in and the fly is wet it will provide plenty of cover. Don’t add too much bucktail!

Step 11: Add a small amount of yellow bucktail to both sides of the fly. These fibers are going to reach 2/3 of the way back on our previous bucktail.

Step 12: For the final batch of brown bucktail we will use a length that reaches just shy of the end of our tail fibers. After you have trimmed the butt ends of the bucktail make a neat thread neck and add two whip finishes. Apply a coat of head cement to the thread wraps.

Step 13: After your head cement has fully dried, dunk your fly in some water so the bucktail fibers can all be washed into the profile the fish will see. Thanks for tying along.

Read more

Top 5 fall flies for Sea Run Cutthroat-From Guest Captain Cole Leishman

Top 5 fall flies for Sea Run Cutthroat-From Guest Captain Cole Leishman

Recently we were featured on Cole Leishman's, owner of Rain City Outfitters, blog. Cole is an all-around great guy that we have had the pleasure of knowing for several years. He owns his own outfitter and guides locally here in Western WA, specializing in everything our state has to offer. We were beyond thrilled to see so many Spawn products getting put to work for Sea Run Cutthroat! We hope you love this blog and that it adds to your Puget Sound arsenal of fantastic flies! For more from Cole, be sure to head over to his website to see fishing reports from his guided trips as well as many other great blogs and resources! 


https://www.raincityoutfitters.com


"I don’t pride myself on being a ‘pretty fly’ tyer but more like functional guide fly tyer. For Puget Sound, if a fly takes me more than 6 minutes to to tie, it is not worth it to me. These fish are so aggressive that it doesn’t often matter what you are fishing with as long as they see it and it looks somewhat similar to what they naturally eat. That being said, here are my top 5 flies for Puget Sound this Fall in order of effectiveness on my boat:

Rio’s Precious Metal

This fly is the complete sea run cutthroat slayer. It has it all: good profile, durability, and tons of flash. Rio did a great job with this fly and this is hands down my favorite fly in Puget Sound. Additionally, it takes under four minutes to tie.

Here’s my recipe:


Simi Seal Shrimp

This pattern seems to work for everything in Puget Sound during the fall and winter months. I like to use it with a medium speed retrieve with a lot of quick jerking motions. When the fish are a little more tentative, like on glassy calm and sunny days, this fly gets the job done for Sea Run Cutthroat, Resident Coho, and Blackmouth.


Simple Sculpin

Sculpins are present year round in Puget Sound but it seems like they are much more effective in the fall months. Maybe the fish are just extra hungry this time of year or maybe there’s less preferable forage available. Either way, it seems that sculpins are a great choice for this time of year and here is a very simple guide fly that has seen a lot of success recently.


Rio’s Just Keep Swimming

This is the staple baitfish pattern in my box that works well in a variety of colors and sizes. Like the first fly in this list, it is very simple to tie but a bit more realistic. This fly is fairly durable but cheap and easy to tie. I like the peacock over white colorway the best. Tie is sparse for a Sandlance imitation or thick for for a herring fly.


Simple Gurgler

The token topwater fly on my list goes to this simple fly that gets the job done. No reason to get fancy here, the cutthroat absolutely love these simple little gurglers. Better yet, you can tie them in just a matter of a few minutes. I like a steady stripped presentation with a subtle v-wake behind the fly. Make sure you keep stripping until the line goes tight, the cutthroat often miss your fly multiple times before hooking up. Add shrimp eyes and change the colors to imitate other sea critters.


  • Hook: Gamakatsu SS15 - sz 8

- Cole Leishman

https://www.raincityoutfitters.com

Read more